Helpful Tips for RVers
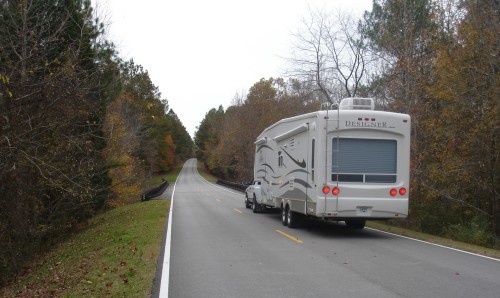
1. TV Antenna up or down?
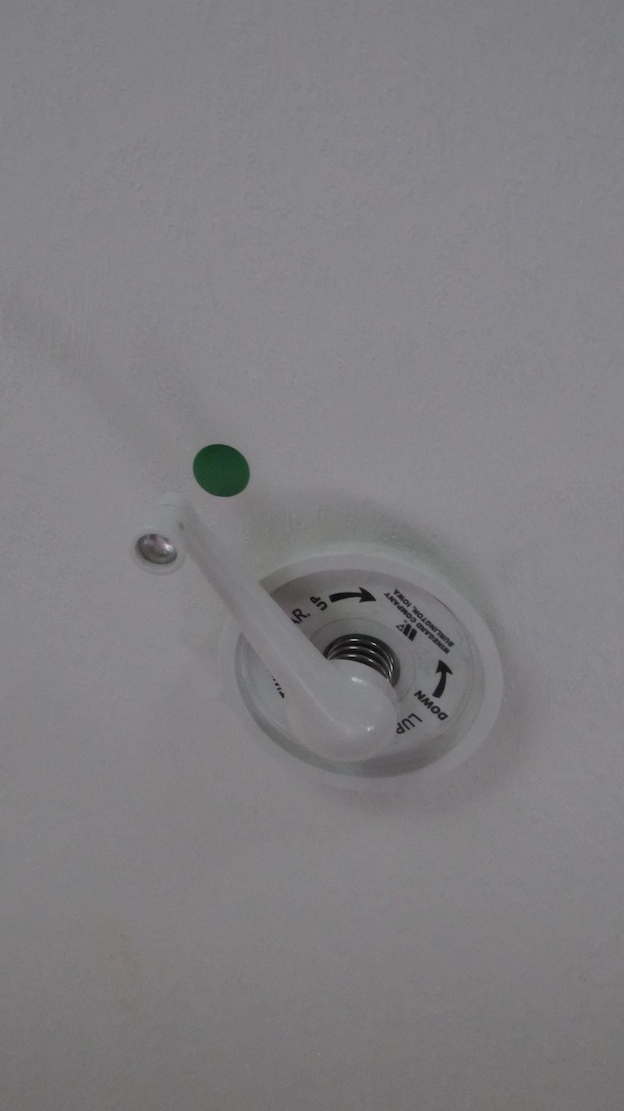
Many an RV’er has been dreadfully reminded, often by a low tree branch or overpass, that they forgot to lower their rooftop TV antenna. And who hasn’t looked up during a walk around to ensure that their antenna is down? I thought of this tip while lying in bed one morning, wondering whether mine was up or down. To insure that it was “down,” I simply cranked the antenna handle until it was down completely and marked the ceiling at the end of the handle, using a stick-on label colored green for “Go.” Get it? On your mark … Go!
When cranking up the antenna, I make sure that the end of the handle is on the opposite side of the mark. Now I just have to remember to check the position of my handle before getting underway.
2. Eliminate water pooling in slide-out awnings
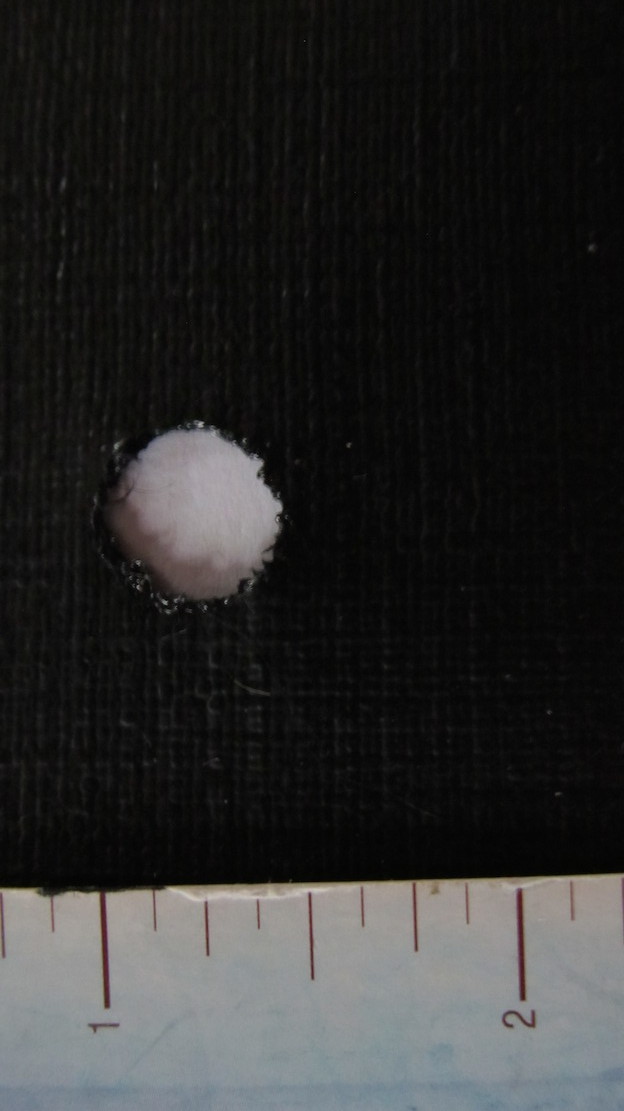
When rainwater collects in slide-out awnings, the weight of pooled water stretches the fabric and eventually may tear it away from the attachment, as it did in my case. RV’ers have used various strategies to deal with this problem, such as repeatedly climbing a ladder to insert, and later remove, items such as plastic frameworks or small beach balls to provide more slant to the awning.
RV manufacturers could easily address this problem by attaching the awning to a higher position on the outside wall, thus providing more slant for draining off water. Until they do so, here’s a simple solution that has worked well for me. With a round soldering iron, I burned a 3/8-inch hole at the low point where water normally pooled. The plastic fabric around the edges of the hole melted to prevent tearing. Now, instead of pooling, rainwater simply trickles down the side of my slide-out. And here’s the best part: I only had to climb the ladder once, and it has been draining nicely for several years.
Note: If your awning is under warranty, be advised that burning a hole in it will likely void the warranty.
3. Using headsets when backing up
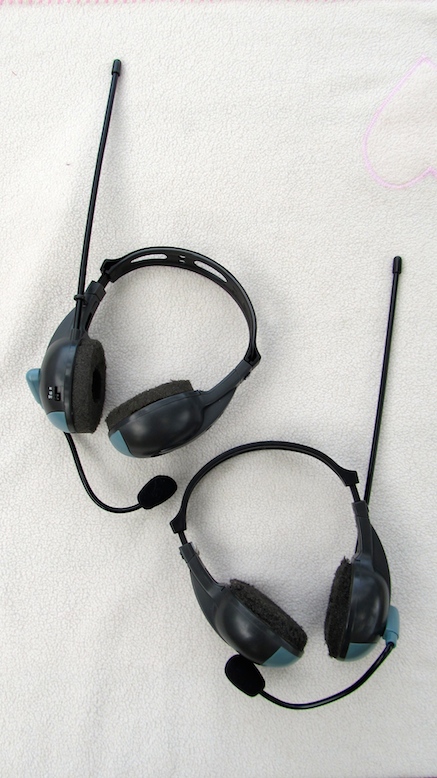
When backing into a campsite, the wife is usually outside as a spotter and the husband is behind the wheel. All too often, the dialogue goes as follows: “Come back. Whoa! No, go forward and turn to the right … further right. Now come back. No, not on an angle, straight back ….” The volume increases to shouting, sometimes accompanied by the spotter pounding on the side of the rig. Anyway, that was us … until we discovered RV Headsets. Our brand is “Tech Link ESP” — Easy, Safe, Parking — which we got for under $100. They’ve been working well for the past eight years, allowing us to communicate quietly and efficiently, without attracting the attention of other campers. I call them “Wife Savers!”
4. Cooking on the level
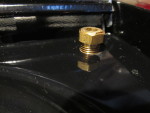
The metal grid of my Magic Chef stove was not level, causing liquid to pool on one side of a frying pan. In my case, the back end was ¾ inch lower than the front. To fix this problem, I removed the two rubber grommets on the back end of the stove top. I then visited my local hardware store with stove top and grid in hand. In the plumbing section, I found two brass fittings (plastic will melt), which screwed perfectly into the holes and had an opening at the other end to accommodate the feet of the grid. After hack-sawing off the unneeded section of each fitting, I screwed them into the holes as far as necessary to level the grid, using a pan of liquid to indicate “level.”
Although my cooking isn’t that great, at least it’s on the level!
5. Boondocking safety
Most RVers, especially when traveling, will spend the occasional night dry camping in the parking lot of a big-box store or casino, or perhaps on a side street in a residential neighborhood. Here are some safety tips to consider: Pick a lighted area near the center of the parking lot, rather than along the edges. Turn on your security lights and make sure all doors, windows, and compartments are locked before retiring for the night. If you’re parked on a residential street, advise the local police by cell phone of your location. Not only will you then have their number in your phone for ready access, most officers will be happy to drive by occasionally to ensure all is well. Lastly, always have a flashlight and the ignition key to the truck, or motor home, beside the bed so you can set off the security alarm if you hear suspicious noises outside. A can of Bear Spray hanging by the door might be useful if you hear “critters” and have to go outside at night. Having done all that, sleep tight!
6. Mouse guards
Mice inside your RV are not only messy, but destructive as well. One entry point is where your water hose comes into the basement through a standard 4-inch hole. To block this entry, buy a cover that is designed to fit the hole. Then hacksaw out a section just large enough to accommodate your hose. Finally, with a scissors cut a piece of SOS scouring pad large enough to fill the hole around the hose. Mice will chew on cheese, electrical wires, and plastic water lines, but not on soapy steel wool.
A second access to multiple entry points is your sewer hose. A mouse can enter a hole as small as a dime and you likely have more than one such hole in your underbelly. To block access to the underbelly via the sewer hose, buy a plastic collar (or cut a piece of flexible plastic) that is used on dogs to prevent them from licking incisions after surgery. Cut off the attachment clips so you can position the smaller end around the sewer hose where it attaches to the outlet. Use duct tape to hold the collar tightly to the sewer hose in the shape of a funne. To remove the funnel, simply remove the tap and store the plastic sheet flat in your basement.
Listen up … not a creature is stirring, not even a mouse!
7. Towel racks
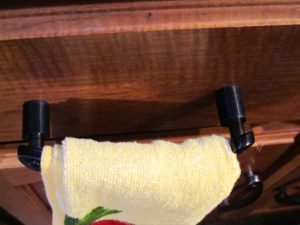 Most RV’s seem to have a limited number of kitchen towel racks. No worries: if you have drawers with handles on them, you have potential towel racks. Drawer handles are often not suitable for hanging dish or hand towels because they are too close to the outside of the drawer. A simple solution is to insert plastic spacer washers (from ½ to 1 inch) between the handle and the outside of the drawer and replace the screws with longer ones. Most hardware stores carry spacer washers and “break-away” screws that can be broken off at appropriate lengths to accommodate the washers. Not only will these handles provide racks to hang towels, but they’ll also hold damp towels away from the wood cabinetry, allowing them to dry more readily.
A word of caution: before implementing this tip, make sure you have space to accommodate the extended handles when your slides are in.
8. Dishwashing gloves clip
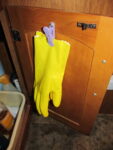
If you don’t like the look of your rubber gloves hanging on your faucet, consider hanging them out of sight on the inside of your sink door. Get a plastic clip with a hole in one handle and attach it to the door by a half-inch screw (drill a pilot hole to accept the screw and make sure it doesn’t go through the door). Place a plastic pan inside the door to keep drippings off the wooden shelf.
You can do the same thing with your dishcloth on the other door for a clutter-free look.
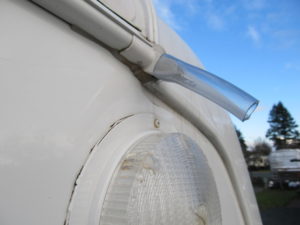
9. Gutter Spout Extensions
 Most trailers have a drip rail to collect A/C discharge water and rainwater that runs off the roof. Many have plastic add-on extensions designed to send water away from the sidewall. Unfortunately, some of these extensions are either not long enough or inappropriately placed. Wind or a protruding light can cause runoff water to dribble down the sidewall, creating black streaks.
My solution was simple and cheap: Since my extension was ¾ inch wide, I bought a short length of 3/4-inch (inside dimension) flexible plastic hose at a hardware store. Then, I cut off a 4-inch piece, heated one end with a hair-dryer for a few minutes until pliable, applied epoxy, and pushed it firmly onto the extension. The epoxy ensures the piece remains in place during transit. Now, runoff water clears the light and the sidewall … no more black streaks.
10. El Cheapo Wastebasket
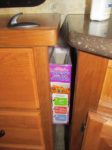
Many RVs do not have an out-of-the-way space in the bedroom/washbasin area for a normal-size wastebasket. However, one side of your dresser will likely be within a few inches of a wall or washbasin. Here’s how you can use that space to discard tissues, razor blades, dental floss, and other small items. All you need is an empty cereal box, some Scotch tape, and a hook with adhesive backing.
Purchase a box of cereal (family-size if space allows). When empty, remove the wax-paper liner and fold down the top flaps of the box on the inside. Secure with tape. Then, with a paring knife bore a hole about 2 inches below the top edge. Replace the liner and snip the four corners; fold down over outside top edges of box and tape in place. Mount the hook low enough, about 8 or 10 inches, so you can insert your hand into the space above the box to discard items. When full, empty and replace. Not only is this basket inexpensive, it is well hidden, durable, and stays put while travelling.
11. Back-flushing Black Water tank
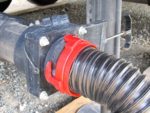
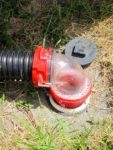
Most RVs have a Black Water Flush, which can be used for about 10 minutes to flush out the Black Water tank. However, if you’re a tad compulsive, like me, and want to get the tank really, really clean, try this tip. It requires a Gate Valve at the end of your discharge pipe and a clear elbow at the far end of your sewer hose (where it enters the campsite receptacle).
After flushing out your Black Water tank, close the Gate Valve and open your Gray Water valve. You can do this twice if you have two Gray Water tanks. The gray water will flow into the Black Water tank to provide further flushing. After a minute or so, open the Gate Valve and watch the discharge water change from clear to brown. When the water runs clear again, shut off the Black Water Flush. When the discharge reduces to a trickle, shut off the Black Water valve, leaving the Gray Water valve(s) open. That’s it. Your tank is now really, really clean, not that you would want to eat lunch down there!
A cautionary note: When using this procedure, do not leave the area or get distracted, unless you want to flush out your rig with toilet water.
12. Keeping drawers closed when traveling
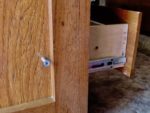
While underway, the bottom drawer in our kitchen island jiggled open about 6 inches and became stuck underneath the refrigerator. Preventing the drawer from opening was simple: I drilled a ¼ inch hole in the outside wooden framework and through the side of the closed drawer. A ¼ inch screw of sufficient length through both holes keeps the drawer closed, and may be partially unscrewed to open.
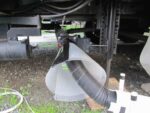
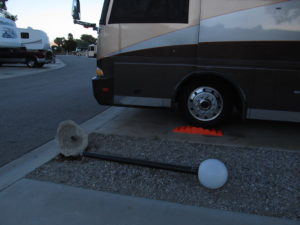
13. Sewer-hose support
Ideally, your flexible sewer hose should slant evenly from the trailer to the campground receptacle.
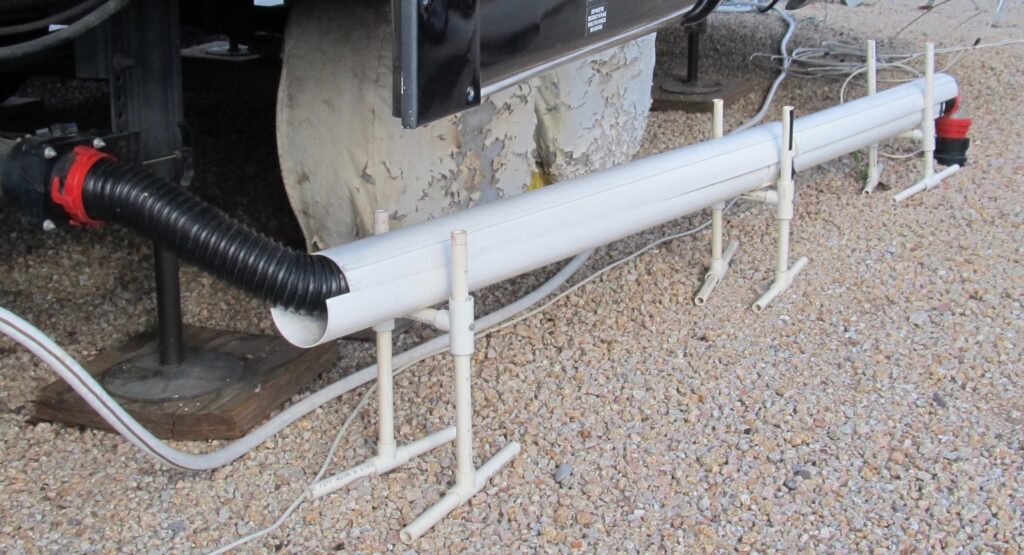
You can build a sturdy inexpensive support by purchasing two 10-foot lengths of plastic rain gutters, ten feet of ½-inch PVC pipe, and twelve ½-inch T-connectors (T’s). Using a hacksaw, cut the rain gutters in half, making four 5-foot lengths. Cut the pipe into various lengths: two 12”, two 9”, and two 6” to serve as vertical sections. Then cut fifteen 4” pieces to serve as feet and cross members. Construct three “goalposts” to support the rain gutters. First, insert two of the 4” sections horizontally into the sides of each of six T’s to serve as “feet.” Then insert the six vertical pipes into the bottom T’s and attach T’s vertically on the top of these pipes. Finally, insert the 4” sections between the top T’s as cross members to support the rain gutters. When setting up, overlap the gutters a few inches and place the middle goal post under the overlap, providing 10 – 15 feet of support, which should be sufficient if your trailer is properly positioned in relation to the campground receptacle.
For easy storage, the rain gutters stack within themselves, and the goalposts lie flat when the 4” cross members are removed. The photo shows my first effort, which was intended to be fully adjustable, but in years of use, I’ve never used the adjustment feature, so this simplified design will work just fine.
14. Arrival and Departure Checklists
 Many RV mishaps occur when arriving at or departing from a campground, sometimes causing serious damage to our rigs (see my RV OOPSIES book on this website). Trust me on this one: the use of Checklists will eliminate these unnecessary Oopsies, saving you some serious grief and cash.
When a friend bought a Class-C motorhome and decided to “hit the road,” I made up the following Arrival and Departure Checklists so she wouldn’t hit anything else! Feel free to modify them to suit your type of rig.
Arrival Checklist (Class-C)
Check-In
☐ Park near office where indicated by signs “Check-in Parking”
☐ Ask if discount is offered, such as Good Sam or Passport America
☐ Request Map of campground and ask for best route to your site
☐ Ask if site is “Full Service” (power, water and sewer)
☐ Request information on park facilities of interest, including entry codes
☐ Ask about local attractions, such as tours, restaurants, attractions
☐ Ask if WiFi is offered and whether Password is required
☐ Ask if Cable TV is available at site; some resorts have cable boxes
Locating RV Site
☐ Find your site on map and determine best entry and exit paths
☐ If site has no sewer, drive to dump station and empty tanks, if needed
☐ If site has no water, drive to available faucet and fill tank, if needed
☐ Drive to site, watching for tight turns and low trees along the way
☐ BEFORE entering site, check for obstacles (picnic table, trees, fire pits, posts)
☐ Confirm site has facilities (power, water, sewer) and test water faucet
☐ Unhitch car unless site is pull-through
Driving in & Parking
☐ Drive into site, USING SPOTTER, in reach of all facilities
☐ Level RV, using levelling blocks under tires if necessary
☐ Set emergency brake on RV and tow car; and lock tow car
☐ Ensure slide can be opened without obstructions
Setting Up
☐ If you have an RV Surge Protector, plug it into outlet and check power
☐ Turn off switch at panel, plug in power cord to RV, then to panel; turn on switch
☐ Open slide, making sure there are no obstructions inside OR outside
☐ Attach pressure regulator or pressure gauge at tap; attach hose and water filter
☐ Connect sewer line, making sure black-water valve is closed
☐ Open gray tank, unless you want to save water to flush out black before leaving
☐ Turn fridge over to Electric and turn on hot-water heater
☐ Plug in TV cable or raise roof antenna
That’s it! Pour a glass of wine and relax …
Departure Checklist (Class-C)
Interior
☐ Store loose items
☐ Close cupboards
☐ Secure drawers
☐ Close ceiling vents
☐ Lower TV antenna
☐ Secure refrigerator & switch to propane
☐ Check level in freshwater tank; add water as required
☐ Close windows and lower blinds
☐ Bring slide in BEFORE removing power cable
☐ Turn OFF water heater, furnace, water pump, & lights
☐ Place trash & recycle items in campground bins
Exterior
☐ Drain holding tanks … black water first, then gray water to flush line. Add chemicals & 2 – 3 gallons of water to black tank through toilet
☐ Disconnect power cable, water hoses, sewer line, & TV cable
☐ Switch water manifold on Normal
☐ Retract awning
☐ Close and lock entry door and storage cabinets
☐ Stow entry steps
☐ Retract stabilizer jacks
Before Departure
☐ Conduct safety inspection – check turn signals, lights, tires, & rear-view camera, clean windows & adjust mirrors
☐ Walk around RV checking windows, slide, TV antenna, vents, cables, jacks, entry steps
☐ Walk around Tow Car checking hitch, turn signals, brake lights, tires, steering unlocked, Emergency Brake OFF, gearshift in Neutral
☐ Watch for tail swing when turning out of campsite
☐ Check for items left in campsite (pressure reducer, door mat, leveling blocks, clotheslines, spouse)
☐ Program next destination on GPS and confirm suggested route on roadmap BEFORE leaving campground
That’s it! You’re on your way to a new adventure … safe travels!